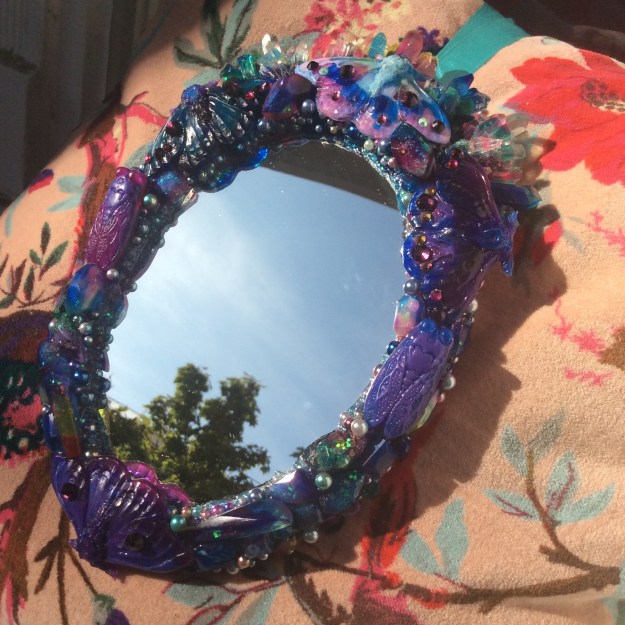
 I started casting UV resin in molds a while back.
I love resin, but casting epoxy resin made me so frustrated. Having to leave the molds undisturbed for a day was so hard for my addictive nature! Plus they always get cat hair in them somehow. Using UV resin has been such a great change. So I got a few detailed molds in July.
 I got moth, cicada and butterfly molds. Of course.
And some gem and jewel molds, and some actual crystal clusters in very stretchy sticky silicon.
 Because you can quickly and easily layer UV resin, it’s a breeze to add inclusions of glitter, gold leaf, dichroic film and microbeads.
I really love the surprises that happen with casting resin – you don’t know exactly what you have until you unmold. I decided to use a bunch of the cast insects and gems to make the frame for a new Gothic Rococo mirror, and found a small oval mirror to use.
 I formed a base for the mirror’s frame out of my usual bulk sculpting materials.
I use tinfoil, crushed and shaped, then stabilized with spurts from the glue gun, then sealed under epoxy clay. It is a fast way to get a lot of volume, and both sturdy and economical, because the expensive (and tedious to blend by hand!) epoxy clay is used only in small amounts. Once the epoxy clay was cured, I painted the whole thing hot pink, above.
Glitter glue gun glue! Hell yes!
 As a base for uv resin, it matches nicely and is even faster than resin.
 I went over the hot pink base with ribbons of blue glitter glue, which smoothed itself as glue gun glue does when you apply a lot at once. Then I covered the glue with blue and pink UV resin.
I didn’t know how the UV resin would work over glue gun glue. The interaction of plastics, which contain – surprise!- plasticizers, and resins, which contain solvents, can be very unpredictable. But UV resin, which is a photopolymer, doesn’t contain solvents. It hardens by cross-linking polymerization reaction, not solvent evaporation.
So it’s a different problem. UV resin glues like Bondic are supposed to be material-agnostic, suitable for use on anything. Is it archival? Who knows! UV resin as a consumer material is only a few decades old. I could have used an isolation coat of Mod Podge, but I was basically too fucking impatient.
Instead, I tested covering sections of the glue gun glue on the back and found that once a solid layer of resin was built up, it cured thoroughly without residual tackiness from chemical interference.
Once the whole front of the frame was covered in UV resin, I started applying molded insects and crystals, using the UV resin as an adhesive.
 There is no material in the history of the world that bonds more seamlessly to itself than UV resin.
Of course, it needs light to cure, so the light needs to be able to reach most of the resin you’re curing. But I find that if you hit the resin with a well-powered professional nail lamp, the visible part will set and spread the reaction well enough to the remaining part hidden under the thing you’re attaching. Yes, it’s a limited Ice-nine.
 I attached the insects, gems and crystals with layers of UV resin, and studded the resin with mermaid pearls and microbeads.
This is one of the very few projects I’ve ever done that came out better than I could have imagined! It is fantastic to look at. I am glad to have made something beautiful at this dark, frightening time. People tell me beautiful things help them.
Creepy Decorative Arts are my thing to make.
I have made several other Gothic Rococo mixed media insect pieces for household decor; links are below! I also want to credit AfroDisiac of Designs by AfroDisiac, whose work with UV resin and gentle encouragement really inspired me to start working with this material!
Silver lead and crystal insect mirror.
Gothic Rococo pastel and pearls insect mirror.
Gothic Rococo insect boudoir stool.

Creepy, but most beautiful. Someone should start a collection of your mirrors. Wish I could.